I. Technical requirements and process analysis (Figure 1)
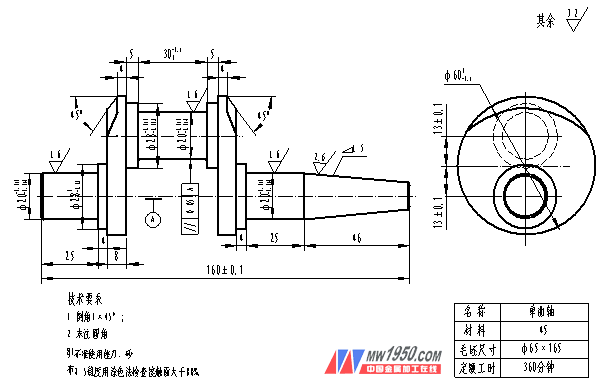
figure 1
1. Main technical requirements:
(1) outer circle ![]() In total,
In total, ![]() 4 in total,
4 in total, ![]() A total of 2 places.
A total of 2 places.
(2) length ![]() 2 in total,
2 in total, ![]() 4 in total,
4 in total, ![]()
![]() 1 each.
1 each.
(3) ![]() Two corners.
Two corners.
(4) Geometric tolerance ![]() The parallelism error between the eccentric outer circle and the axis is
The parallelism error between the eccentric outer circle and the axis is ![]() .
.
2. Process analysis:
In the machine, the change from rotary motion to reciprocating motion is often done by an eccentric mechanism or a crankshaft; the eccentric workpiece and the crankshaft are generally machined on a lathe.
Eccentric workpieces, crankshafts and external turning have many things in common, but eccentric workpieces and crankshafts have their own special points, which is that the axes between the outer and outer circles of the workpiece are parallel and do not coincide. The outer circle axis of the workpiece is parallel, which is called "eccentricity", and the distance between the two axes is called "eccentricity".
The eccentricity of the car is the same as that of other parts of the car. The machining method is not static, but different methods are adopted according to the different quantity, shape and precision requirements of the workpiece.
First, consider the shape, dimensional accuracy and tolerance requirements of the part and choose the appropriate machining process. Therefore, the prior process analysis must be accurate, of course, reliable processing methods and steps are also crucial.
(1) The shape of the eccentric workpiece is completely processed by turning. Therefore, it should be carefully considered, and the processing technology and processing steps must be selected.
(2) The eccentric workpiece can be turned by two top clamps. In order to ensure the parallelism of the eccentric outer circle and the axial line and other related precision requirements, the turning tool must have sufficient strength when turning the eccentric portion. It should be noted that the carbide turning tool is easily damaged when turning, and the top end is not evenly stressed when the car is eccentric, and the front tip is easily damaged or displaced. Therefore, it must be checked frequently.
(3) Before using the two apex car eccentric workpieces, first use the three-claw automatic centering chuck to clamp the outer circle at one end of the workpiece, and turn the plane at the other end of the workpiece to drill the center hole, and the one-clip-clip turning outer circle to Size requirements, length as long as possible. Then use the three-claw automatic centering chuck to clamp the machined outer circle, and set the total length of the workpiece, the flat end face, the drilling center hole, and the surface roughness of both ends of the workpiece should meet the requirements.
Second, processing difficulties and solutions:
1. The machining quality of the center hole of the eccentric workpiece has a great influence on the machining accuracy of the workpiece. The position of the center hole of each end of the eccentric workpiece requires one-to-one correspondence. If the center holes of the two ends are not on the same line, the axis is skewed, or the center hole Surface processing is not round and not smooth; it will seriously cause shape error and position error after machining of crankshaft workpiece. Therefore, for eccentric workpieces with high precision requirements, the center hole should generally be machined on a high precision coordinate boring machine.
2. The eccentric workpiece is clamped on the two top points. Due to the uneven distribution of the force points on the outer circumference of the workpiece, the clamping will be weak, and large centrifugal force and impact vibration will occur after driving or cutting, which will cause the workpiece to appear. Unevenness and cutting vibration of the workpiece's outer circle may cause serious accidents.
3. When processing long crankshaft workpieces, the most prominent contradiction is that the workpiece has poor rigidity, unbalanced rotation, easy deformation, and difficult processing; the method of support screw support after crankshaft machining can increase the rigidity of the workpiece and reduce deformation and vibration; It must be noted that the top and support screws cannot be over-tightened. If the support is too tight, the workpiece will be bent and deformed. If the support screw is too loose, the support will not be able to fly.
4. After the eccentric workpiece is clamped, the original center line has been offset by a certain distance. In order to prevent accidents caused by the broken tool, the cutting of the workpiece should start from the highest point of the workpiece.
5. When checking the eccentricity e, the workpiece should be measured by a dial indicator between the top and the top. (Maximum reading on the dial indicator - minimum reading = 2e), if the dial gauge is not enough, add a block gauge or install a dial gauge and measurement on the height gauge.
6. Turning the eccentric workpiece, the cutting speed should not be too high, and the front and rear corners of the turning tool should not be worn too much.
7. When the car is eccentric, the top end is not evenly stressed, and the front tip is easily damaged or displaced. Therefore, it is necessary to check and ensure that the two tips are in a frictional and gap condition.
8, pay attention to adjust the gap of the lathe spindle, especially when the accuracy of the lathe is poor, it is more important.
Third, the processing method and steps of this example
1, the parts are prepared ![]() , 45 #钢棒料. Clamp the blank with a three-claw automatic centering chuck
, 45 #钢棒料. Clamp the blank with a three-claw automatic centering chuck ![]() Outer circle
Outer circle ![]() Long correction, flattening the face, drilling
Long correction, flattening the face, drilling ![]() Center hole. Clamp again
Center hole. Clamp again ![]() Outer circle length
Outer circle length ![]() At the same time, use the top of the activity to adopt a method of sandwiching and topping. Rough car, finishing car Φ60 0 -0.1 mm to size requirements, then turn the end of the car, pay attention to the thin copper skin, to prevent pinching the surface of the workpiece, the total length is controlled to 160 ± 0.1 mm size requirements. Drill Φ3mm center hole. (Figure II)
At the same time, use the top of the activity to adopt a method of sandwiching and topping. Rough car, finishing car Φ60 0 -0.1 mm to size requirements, then turn the end of the car, pay attention to the thin copper skin, to prevent pinching the surface of the workpiece, the total length is controlled to 160 ± 0.1 mm size requirements. Drill Φ3mm center hole. (Figure II)
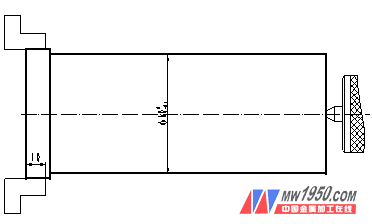
figure 2
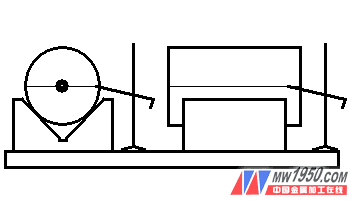
image 3
Rotate the workpiece by 90°, align the centerline with a 90° angle, draw a vertical centerline on the end face and the outer circle Φ60mm, and draw a centerline with an eccentricity of 13±0.1mm at both ends. At the two ends, draw another center line with an eccentricity of 13 ± 0.1 mm, see (Figure 4), (Figure 5). Four 3mm center holes were precisely drilled at the four eccentric centers.
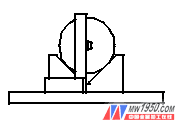
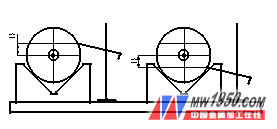
Figure 4 Figure 53
Clamp the outer circle of Φ60 0 -0.1 mm with parallel clamps, and clamp between the centers of the two crankshafts. The outer diameter of the crankshaft of the rough and fine car is Φ28-0.010 -0.035 mm×40mm, and Φ20 -0.010 -0.018mm×30 +0.1 0mm.
Note the machining of the final fillet R1. (Image 6)
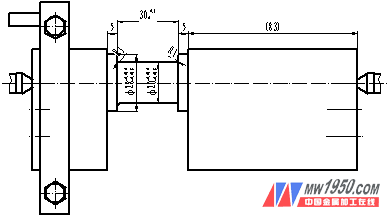
Image 6
4. Clamp the outer circle of Φ60 0 -0.1 mm with parallel clamps, clamp the workpiece between the top holes of the two supporting journals, and install support screws on the middle groove of the machined crankshaft to increase the rigidity of the crankshaft; when using the support screws To ensure that the screw has sufficient supporting force to prevent the screw from falling out. More attention should be paid to prevent excessive support and deformation of the crankshaft. The rough car is Φ30mm×74mm, and the intermediate wall thickness is 8 mm and the chamfer is 45° and the length. (Figure 7)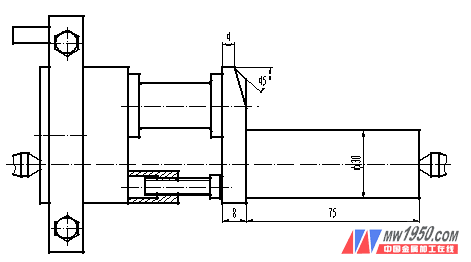
Figure 7
5. Turning the head: Use the parallel clamp to clamp the outer circle of Φ30mm, and clamp the workpiece between the center of the two supporting journals. The coarse and fine cars are Φ25 0 -0.05 mm×29mm and Φ20mm-0.010 -0.018×25mm to the size requirement and down. The angle is 1×45°, and the intermediate wall thickness is 8 mm and the chamfer is 45° and the length is controlled. (Figure 8)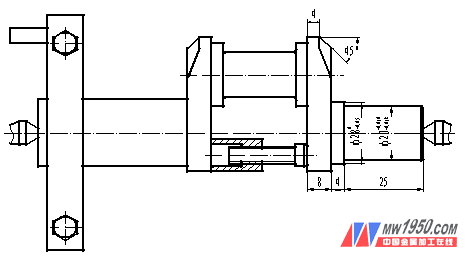
Figure 8
6. Turning the head: Clamp the outer circle of Φ20 mm with parallel clamps, and clamp the workpiece between the center of the two supporting journals. The thick and fine cars are Φ28 0 -0.05 mm×75mm and Φ20mm-0.010 -0.018×71mm and the taper 1: 5 to size requirements, control intermediate wall thickness size 8mm and chamfer 1 × 45 °. (Figure 9)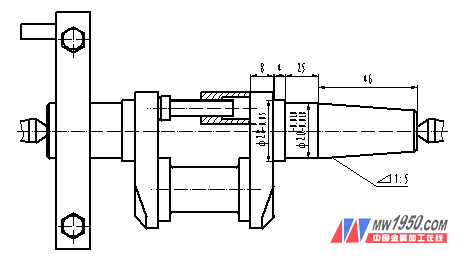
Figure 9
At this point, the processing process has basically ended, and the chamfer is deburred and sent for inspection.
Fourth, inspection methods
1. Using two top-notch methods (see Figure 10), install the dial indicator on the tool holder. The contact of the dial indicator refers to the outer circle of the finished car Φ60±0.1, and the crankshaft is rotated a little up and down. At the highest point, the dial gauge is set to zero, and then the dial gauge contact is pointed at the lowest point of the outer circle of Φ60±0.1, and the crankshaft is rotated a small amount, and the reading is performed at the lowest point, and the highest number - the lowest number = the actual eccentricity. In the same way, the actual eccentricity values ​​are taken at two places, and the average of the two values ​​is the eccentricity of the workpiece. However, this method only adapts to the case where the eccentricity is smaller than the measurable range of the dial gauge, and the following method should be adopted for the eccentricity (such as the eccentricity of 26 in this example).
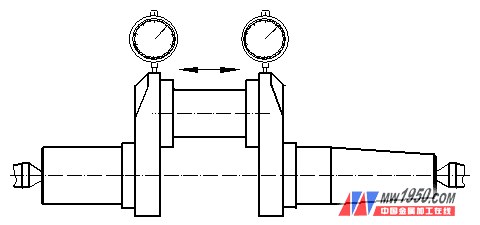
Figure 10
2, still using two top methods (see Figure 11), the dial indicator is installed on the height of the ruler, the height of the ruler is placed on the small skateboard that has been removed from the tool holder, the contact of the dial indicator is fine On the outer circumference of the car Φ60±0.1, use the height vernier to make the whole reading, the dial gauge is micro-read, and the reading at the highest and lowest points is subtracted to find the eccentricity. The eccentricity can also be obtained by using the block gauge, and the rest can be as described above.
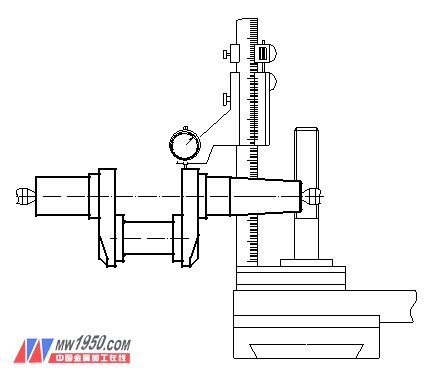
Figure 11
3. Parallelism measurement (Fig. 12), place the journals at both ends of the workpiece on the special inspection tool, and then check the parallelism of the crankshaft axis to the journal axes at both ends in vertical and horizontal four different positions. The error shall be less than the tolerance of 0.05 mm specified in the drawings.
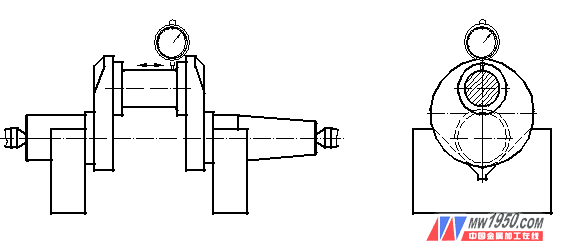
Figure 12
When turning, first turn the workpiece to the required diameter and length, and flatten the two end faces. The eccentric portion can then be turned by placing a spacer of appropriate shape and thickness on one or both of the jaws of the three-jaw chuck. The shape and thickness of the gasket can be selected according to the size of the eccentricity. Since the shape of the gasket is different, the calculation method of the thickness dimension of the gasket is also different. 1. Calculation of the thickness of the square gasket: The eccentric workpiece with small turning eccentricity (e ≤ 5 ~ 6mm) can be square gasket as shown in Figure 13.
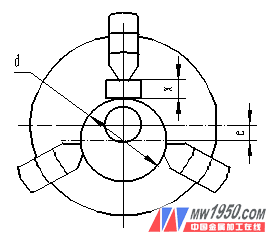
Figure 13
The thickness of the gasket can be calculated by the following approximate formula:
X = 1.5e (1- ![]() )
)
Where: X - gasket thickness (mm)
E—eccentricity of the eccentric workpiece (mm)
d—The diameter (mm) of the portion of the eccentric workpiece jaw.
The eccentric workpiece jaws shown in the figure have a diameter of 60 mm and an eccentricity of 4 mm. The thickness of the spacer is:
X = 1.5 × 4 ( 1- ![]() ) = 6 × 0.9917 = 5.95 (mm)
) = 6 × 0.9917 = 5.95 (mm)
2, the calculation of the thickness of the sector gasket
When turning a workpiece with a large eccentricity (e>6mm), a sector gasket can be applied as shown in Figure 14.
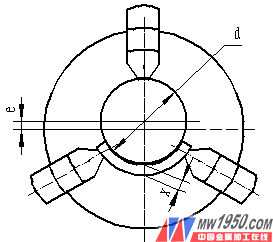 Figure 14
The thickness of the sector gasket can be calculated using the following approximate formula:
X = 1.5e ( 1 + ![]() )
)
If an eccentric workpiece has a diameter of 36 mm and an eccentricity of 10 mm, the thickness of the sector gasket is:
X = 1.5 × 10 × (1 + ![]() ) = 16.14 (mm)
) = 16.14 (mm)
3, the correction of the thickness of the gasket
Since the thickness of the gasket obtained by calculation is only an approximation, the accuracy of the three-jaw chuck jaws, the hardness and strength of the gasket material also affect the eccentricity; and in practice, the gasket with the calculated thickness is used. The machining of eccentric parts is often greater than the required eccentricity, which requires a test method to correct the thickness of the gasket. Generally, an eccentric workpiece is first turned according to the calculated thickness of the gasket, and then the eccentricity of the workpiece is inspected, the eccentricity error value is measured, and the thickness of the gasket is appropriately corrected until a part with an eccentricity is processed.
Permanent Magnets,Neodymium Magnet,Ndfeb Magnet
U Polemag Electronics & Technology Co., Ltd. , http://www.xm-magnet.com
